Home PCWindows How to Create Wi-Fi Hotspot in Windows 10 using Command Prompt

How to Create Wi-Fi Hotspot in Windows 10 using Command Prompt

by Editor
Create Wi-Fi Hotspot in Windows 10 using Command Prompt
Turning your Windows 10 PC into a Hotspot Network is fun as well as the need of the hour. Many of us use wired connection or dongle for Internet connection and may decide to share the connection someday. If that’s the case, then creating a Hotspot will be an easy option. The option sounds easy only when we do not need to install any third party software and launch it every time for sharing the connection. A number of third-party software are available online which enables us to create a hotspot.

Also Read: Increase RAM of Windows PC using Pendrive.

But why go through the hassles of installing third-party software when you can create a Wifi-Hotspot with the help of few commands. Now, you must be thinking if this method will work on different versions of Windows or not. Well, the answer is yes. You just need to follow the same procedure on Windows 7, Windows 8, Windows 8.1 and it will work for you. In this post, we have listed some methods by which you can easily Create Wi-Fi Hotspot in Windows 10 using Command Prompt.

Steps to Create Wi-Fi Hotspot in Windows 10 using Command Prompt

Remember to create a Wi-Fi Hotspot Network your device must have a wireless card installed and it should be turned ON.
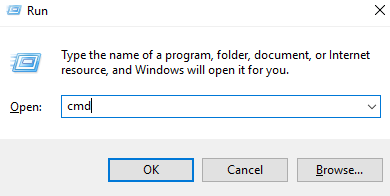
Step 1: Firstly, open the command prompt on your system. You can open it by pressing Window + R key and type cmd then press enter. The command prompt window will appear on the screen. One key thing to remember before opening the command prompt is you have to open it as an administrator.
Run


Step 2: Now enter the following command as it is “netsh wlan set hostednetwork mode=allow ssid=Techviola key=techviola”. In the command in place of Techviola, you can give any name of your choice that is Hotspot name and here techviola is the password you can have any password. Then, press enter you will see the following message if hotspot created successfully.
Command Prompt

hosted network mode has been set to allow.
The SSID of the hosted network has been successfully changed.
The user key passphrase of the hosted network has been successfully changed.

Step 3: Now you have to type the following command “netsh wlan start hostednetwork” in the command prompt. After this, your system will start hosting network and connection name will appear in the Network Connection list.
Command Prompt


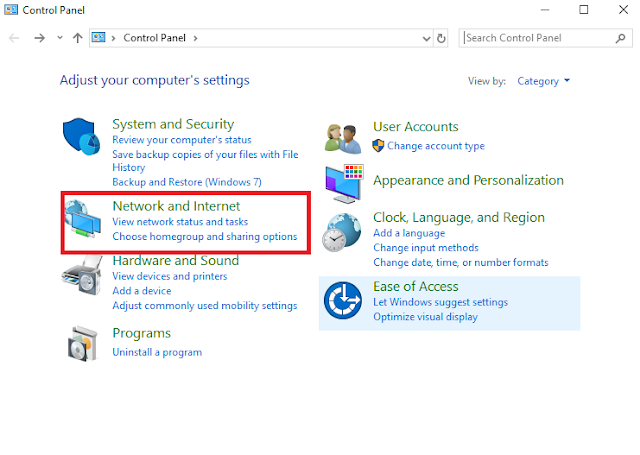
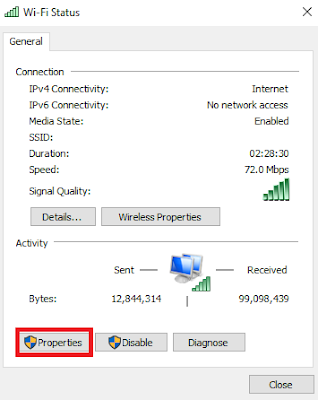
Step 4: To start sharing the Internet connection Go to Control Panel -> Network and Internet -> View Network status and tasks. Click on the currently connected network and go to its properties.
Windows 10 Settings

Create Wi-Fi Hotspot in Windows 10 using Command Prompt


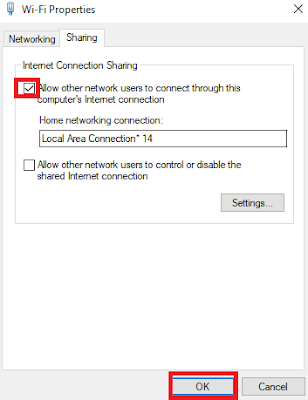
Step 5: In next step click on sharing tab where you will see the option “Allows other network users to connect through this computer’s Internet connection”  just check it. After that click on “Select a Private Network” and select new Wi-Fi connection from the list. Lastly, click on OK button.
Create Wi-Fi Hotspot in Windows 10 using Command Prompt


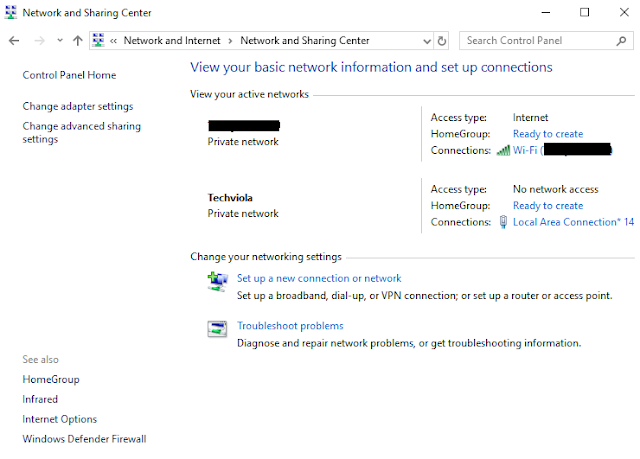
Step 6: Now if you go to Network and Sharing option in control panel. You will see the newly created WiFi-Hotspot as an active connection.

Create Wi-Fi Hotspot in Windows 10 using Command Prompt

That is it enjoy using the newly created Wi-Fi Hotspot Connection on your phone, laptops etc. If you want to stop the Wi-Fi connection then just type “netsh wlan stop hostednetwork” in the Command prompt or disable the Wi-Fi.

Wrapping Up

So, this was one simple method to Create Wi-Fi Hotspot in Windows 10 using Command Prompt. If you face any difficulty following the steps, then do comment in the comment section. We would love to help you and get the problem sorted out.

Leave a Comment